Tuesday, April 8, 2014

Easy Peasy Laundry Detergent

Easy Peasy Laundry Detergent

Each batch yields approximately 32 ounces (between 32-64 loads based on how many Tbsp used per load).

Ingredients


Directions

Thoroughly stir together for 5 minutes and enjoy the results! You can take this a step further and blend the mixture in a blender or food processor to create a powder that will dissolve easily even in cold water. (Just be sure to let the dust settle before removing the lid of your blender or food processor so you don’t inhale the fine particles.) Store in a sealed container with a small scoop.

To Use

Use 1 Tbsp per load (or 2-3 Tbsp for large or heavily soiled loads).

Laundry ingredients

I purchased all these ingredients at my local grocery store:
Note on ingredients: use whatever ingredients you are comfortable with. Many people cannot afford natural soaps, while others make their own. Brands of commonly used bar soaps include Pure & Natural®, Fels-Naptha® and/orZOTE®. Both ZOTE® and Fels-Naptha® are made for and sold as a “laundry bar.” If you’re looking for a pure, natural solution you’ll need to go with a handcrafted soap so you can be sure of its ingredients.
All items can be found in the laundry aisle of most grocery stores.

Monday, April 7, 2014

Facial Natural Remedies

Facial Natural Remedies 

I began making my own natural products in 2007 and I started with facials. I battled acne in my early 20's and it was frustrating pinning down the right products to use and what would keep my skin soft and beautiful. It was not until I began to pamper myself with facial steams, facial scrubs and my own handmade soaps that my skin became balanced, vibrant, and beautiful. I will share a few of my recipes as well as some well known home remedies for beautiful vibrant skin.

Facial Steam
(Tru's Favoritest)
It is very good to do a facial steam once a week. It is just like going to the sauna to sweat out impurities. This gives your skin the opportunity to release built up dirt, toxins from hair products, and cleanse from the past week. A facial steam is easy and simple. It is a basic combination of pure hot water, a medicinal (burdock root), soothing (chamomile), and restoring herb (comfrey). You can pick any herb this is just an example. You will need 5-10 minutes of time alone.

You will need:
A large bowl
A large towel
Herbal Combination
A saucepan
Pure Water

Directions: 
Wash your face with a castile or un-scented soap. 
Leave your face lightly wet, do not towel dry.
Fill your saucepan with water and bring to a boil.
Add your herbs. (If it is a root herb simmer for 20-30 minutes then add leafy herbs for 3 minutes)
Turn off fire and place top on the sauce pan.
Safely pour the mixture into the large bowl (if you wish you can just leave the herbal mixture in the saucepan)
Place the bowl or saucepan on a flat surface and sit where you can safely lean over the bowl without getting too close.
Drape the towel over your head covering the entire bowl while covering all spaces so the steam does not escape.
Allow the steam to massage your face for 5-10 minutes.
Gently rinse your face when finished.
Air Dry your face.

Honey Pat:
(Tru's favorite)
After a facial steam applying a honey pat is heaven sent! 

You will need:
Organic or local raw honey

Directions: 
Massage honey into your skin softly
Began to pat your face until your hands get so sticky it's hard to separate it from your face
Allow the honey to stay on your face for 5-10 minutes
Rinse with warm water and a final rinse with cold water to close your pores
Apply a toner or witch hazel
Air Dry

Tried and True Facial Remedies:


Acne: A few months ago I stopped using face wash. I use a scrub of baking soda and coconut oil every few days. 
On the days in between, just coconut oil. I use tiny amounts - a pinch of soda, and a bit of coconut oil the size of a pencil eraser. Wash in gentle, circular motions and rinse very well. Your face may seem oily afterward, but within a few minutes the oil is absorbed and 
your skin is glowing. My face used to break out regularly. Now, almost never!


Interesting black-head remover: use half lemon from the fridge (doesn’t matter if some juice is already squeezed from it) 
and put 3-4 drops of honey on it. Rub the lemon on your face, emphasizing trouble areas. 
Leave the lemon and honey mixture on your face for 5 minutes and then wash it with cold water. 
You will be able to see the results immediately. 
Additionally, lemon juice will also fade other marks/spots on the face and honey will moisturize.

Clear Complexion: 1 tbsp. citrus juice and 1 tbsp. baking soda. Combine the citrus juice and baking soda, 
it will fizz a lot so stir until the bubbling lessens. Apply to your face and then leave on for 20 min. 
and then rinse. Benefits: citrus exfoliates and brightens and helps keep pores clean. 
Baking soda takes away dead skin cells and helps to prevent blackheads.

Face Mask: I learned from a friend of mine who is well known fashion model. 
She told me to mix lemon juice and egg white together and put it on my face as a mask. 
Let it dry and then rinse it off with warm water. I did this every Sunday, after doing this my skin was less oily, The breakouts became non existent and all the acne scars were gone. pin now, try over winter break :)

Radiant Skin: Take a Vitamin E capsule and open it on your face so that oil present in the capsule fall on your face and then give your face a light massage and let it soak for 30 minutes. Take egg white and apply it on your skin and let it soak for 30 minutes and then rinse with cold water. These two home made remedies can help you get rid of your acne and open pores problems and with its regular use, your skin will become smooth and radiant within few days.


Saturday, April 5, 2014

Make your own scented candles!

Make Your Own Scented Candles 


Learning how to make candles has been at the top of my list for a long time. For years now, I’ve sourced most (if not all) of the candles I burn in my home on the cheap from garage sales, because they’re readily available for a good price. A dime here, a quarter there— a dollar if and only if the candle is exceptional. I’ve never had to resort to paying $5-$25 for a single scented wax candle in retail stores.

Candle-making is a long-beloved crafts. You can use them in your own home, or take the tutorial and make candle gift favors for an event. I prepared for this project by gathering a few items:braided wick ropewick tabs, 5 pounds of unscented soy candle wax (soy burns longer than paraffin), and a small container of fragrance oil formulated for use in candle-making: Cinnamon Sugar! I had trouble finding a variety of scents, but came across this one at the local craft store. Hopefully this means that my house will smell like delicious baked goods all winter.
materials for making your own candles at homeI have lofty dreams, now that I’ve gotten my feet wet, to attempt DIY pillar candles, so check out this tutorial and then check back soon for more candle making ideas. And if you’re still swatting mosquitoes this summer, you can also learn tomake your own citronella candles.
advertisement
 Gather materials for your custom candles.

Step 1

I’d like to eventually explore different forms for my candles, hopefully mastering the art of the pillar candle, but I have to graduate up to that. Summertime goals. For now, I found a glass vase that I liked at a local vintage shop (one that I can either reuse for future candles, or retire into a classic vase) and set out on a mission to make a great candle for my home.
 Assembling Candle wicks using wick tabs and braided rope. DIY to save money!

Step 2

I didn’t buy the pre-tabbed wick assemblies, the ones that come pre-assembled, because I wasn’t exactly sure what size candles I would decide to make. Buying the materials separately cost a little less anyways (just about $8 for 150 wick tabs and 100 feet of braided rope).
To assemble the wicks, cut lengths of the waxed rope for the candle. For ease of making the candle, cut a few inches longer than needed so you can trim the wicks to length at a later point. Secure one end of the wick rope into the wick tab base, and use needle nose pliers to pinch the metal tight.
 Melting soy wax in a double boiler for homemade candles.

Step 3

To melt the wax, set up a double boiler system on your stovetop. It is important to watch the temperature of the wax with a thermometer as it climbs. You will need to heat it to 180 degrees Fahrenheit.

Step 4

When the wax is 180 degrees and all of the flakes have melted, remove it from the heat, add your fragrance oil (optional) and color (optional, not used in this tutorial) and let it cool down to about 125 degrees. Contrary to what you might think, the wax will stay completely liquid during this time! Note: If you add the fragrance oil while the wax is still over the heat, you risk the scent evaporating away.
 Putting a wick into a DIY candle.

Step 5

When it reaches 125 degrees, carefully pour the wax into the container(s) of your choosing. Allow the wax to sit for a few moments, watch for the bottom and top edges to begin to solidify around the container, and then drop in the assembled wick and tab. I used a chopstick to help push the tab down to the base of the container and center it, and then looped the end of the wick, centered in the candle, over a construction pencil that wasn’t likely to roll away.

Step 6

Your work is done! Let the candle solidify for several hours, and trim the wick down to a 1/4 inch. Any excess braided rope can be saved for a day when you make a shorter candle.

Step 7

I can report that making a candle of this size used about 2 pounds of wax. I still have 3 pounds of wax (and plenty of wicks and rope from my original $25 investment) to make a lot more candles before summer time! 

Wednesday, April 2, 2014

Homemade Bubble Bath Recipes

Homemade Bubble Bath Recipes

-via home remedies


Homemade Bubble Bath -  Natural Bubble Bath Recipes, Fun, Simple, Great For Your Skin & The Whole Family Can Enjoy!

I'll show you some bubble bath fun for kids, milk bath recipes, Castile soap recipes, a bath bomb recipe and more!!
I like using Castile Soap in my homemade bubble bath recipes because it is made from olive oil instead of animal fats which can be found in many other soaps.
Castile Soap originated in the Castile region of Spain and has been around since 1567.                                           
You can find it in most all health type stores and available in liquid or bar form, providing more options for the user.
I buy the plain (it can come in eucalyptus, peppermint, lemon, etc) to avoid competing with the use of essential oils.
O.K., time to get started!!!


 Homemade Basic Bubble Bath Recipe
(Use ¼ Cup of your favorite recipe for a special bath treat!)
4 Cups Water (distilled is a better choice than tap – stays fresh longer or boil water first, allow to cool)
1 Cup liquid Castile Soap 
5 drops of essential oil of your choice.
Keep in mind, do you want your bubble bath to be relaxing? (lavender, clary sage, geranium, bergamot, sandalwood)
Invigorating? (Eucalyptus, Lemon, Peppermint)
Relax sore muscles? (bergamot, ylang, ylang, eucalyptus)
Calm irritated skin? (lavender, peppermint, tea tree)
I would recommend mixing just the water and soap, pouring solution into a glass or plastic bottle and with each bath, you can add the essential oil(s) of your choice at that time....Add oil after filling tub and give a quick hand stir before entering.

 Homemade Simple Coconut Milk Bath

1 C Coconut Milk - Simply add to your bath, stir by hand before entering.   Of course you can also add 5 drops of essential oils or simply enjoy the soothing and moisturizing benefits of a coconut milk bath.
Option:   You can also add 1/2 C of Rose Water or 1 C Rose petals.  Learn how easy it is to make your own rose water.   


Homemade Coconut Oil Bath
(substitute coconut oil with almond oil if you don’t like the coconut scent)
Use ¼ Cup per bath
4 Cups Water (distilled or boiled first, let cool)
4 oz. liquid Castile Soap
3 oz. Coconut oil
Pour ingredients into a glass or plastic bottle, give it a good shake to mix.


Homemade Vanilla & Honey Bubble Bath 

Use 1/4 C per bath
1 Cup Almond Oil
½ C honey
½ C Castile soap
1 T Vanilla
In a sauce pan on low heat, stir the almond oil and honey 3-4 mins. (just want it warm and mixed)
Remove and let cool 10-15 minutes.
Add Castile soap and pure vanilla extract then stir and transfer to glass or plastic bottle.
Honey helps our skin retain the moisture from the almond oil and both provides nutrients to our skin (vitamin B, C & riboflavin along with beneficial minerals)

Homemade Dry Bubble Bath Mix
2 Cups Powder Milk
1 C Cornstarch (good for itchy skin)
4 oz Castile Soap flakes (grate from bar soap - using a cheese grater)
Add 5 drops of essential oil and mix well.
Sprinkle desired amount in bath and stir by hand before entering  

 Bath Bomb Recipe
Ingredients Needed:
1 C Baking Soda  
1/2 C Citric Acid
1/2 C Corn Starch
1/3 C Epsom Salt
15 drops essential oil   
Witch Hazel or water (in a spritz/spray bottle)
Mix dry ingredients well - (sifting will prevent clumps)  Add essential oils and mix well.
Putting it Together - 
Begin by mixing together your dry ingredients. Sifting each ingredient as it is added will help to prevent clumps. Sprinkle essential oil over the powder and mix some more.  (15 drops max)
Spritz (with a squirt bottle) the witch hazel onto your mixture while stirring.  When it starts to stick together, it's time to mold.  Do this quickly.
Put the bombs in molds or use ice cream or melon ball scooper – wait a few minutes and tap them out. Let them air dry for 3 or 4 hours and voila! (good to let air dry another 24 hrs. before wrapping in plastic - good for several months)
If you want to soften your bath water, use 2 T of light oil mixing in with essential oils.

How to Add Essential Oils to African Black Soap

Quick Tip: How to Add Essential Oils to African Black Soap

-Via DIY Craft Soap Making


Black soap or African black soap is an all-natural soap made from shea butter, plantain leaves and cocoa pod ashes. It's a very mild soap that can be used for gentle facial cleansing or hair care, and is often praised for relieving oily skin and eczema.
The 'formalator' in me likes to add essential oils to black soap for aromatherapy benefits, however, unlike melt-and pour-soap bases, black soap can be difficult to alter. It doesn't melt easily unless you add water, but this only makes the soap very soft and it evaporates quickly.
Here's a quick tip on how to successfully add essential oils or other fragrances to black soap, while retaining a solid bar format. This recipe makes two 3oz bars or two 85 gram bars.

Supplies


blacksoap-materials

1. Preparation

Cut the black soap into cubes and place into heat-safe ramekins.

blacksoap-step1a
blacksoap-step1b

2. Cover and Heat

Step 1

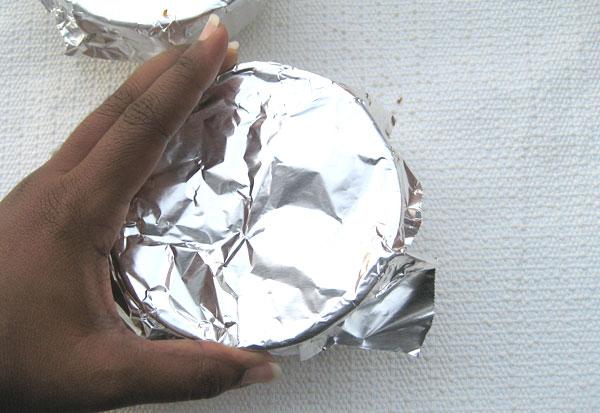
Tightly cover the containers with foil and place in the oven at 250 degrees Fahrenheit or 120 degrees Centigrade.

blacksoap-step2

Step 2

Heat for one hour or until the black soap becomes soft and pliable.

blacksoap-step2b

3. Add the Oils

Add your choice of essential oils or fragrance.

blacksoap-step3

4. Mix

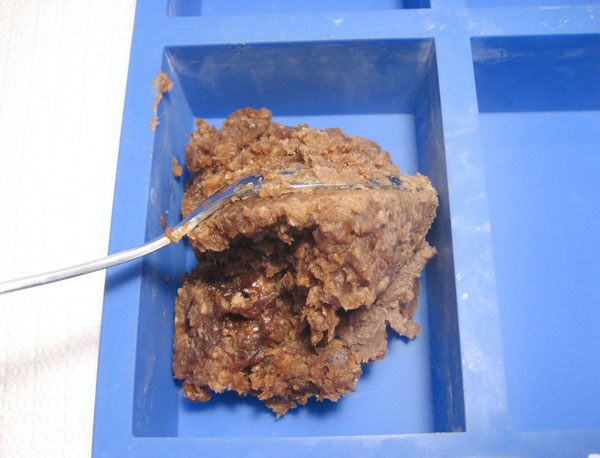
Use the spoon to incorporate the essential oils with the black soap. Work quickly because the soap tends to harden quickly.

blacksoap-step4

5. Spoon Into Molds

Spoon the black soap into soap molds and leave to cool. This shouldn't take long.

blacksoap-step5
blacksoap-step6

6. Pop Out the Molds

Once hardened, carefully release the black soap out of the molds and you're done!

blacksoap-final

Use Your Aromatic Soap

You've just learned a quick tip on how to add essential oils and other fragrances to African black soap. Black soap is a great natural soap all on it's own, but you can enhance its properties by incorporating a custom mix of essential oils for added aromatherapy and skin care benefits. Try using a few different combinations and see what works for you.